In this new tutorial, we will present the Sketchup scenes, that is to say the creation and use of scenes in Sketchup. The main part of this tutorial can be found on our Youtube channel:
SKETCHUP ANIMATION AND GRAPHIC INTERFACE
Before we get into SketchUp scenes, let’s review some of the basics, keyboard keys and shortcuts you’ll need to import a scene into SketchUp animation. Expand your toolbar on your menu bar. Click on an object; this allows you to select it. Using the wheel click allows you to rotate an object in orbit. Also, play the animation of all scenes in Google SketchUp by right clicking on open tab and then “play animation”.
Other commands also allow you to bring up the menu, duplicate or rename layers, hide the open window, or highlight text or objects (using double-click, the left mouse button or the cursor, for example). Familiarize yourself with this shortcut bar to better understand scene layout with SketchUp animation.
CREATE A SCENE WITH SKETCHUP ANIMATION : THE DIFFERENT METHODS (TUTO)
We will take the scene from our previous tutorial. I refer you to it.
To create this scene, we first did “show menu” via one of our previous shortcuts. In the second step, you press the “Animation” key and “Add a scene”.
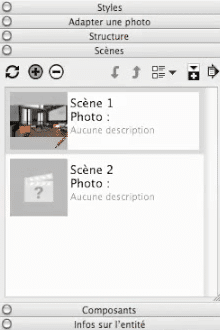
But for this new tutorial, we will use a new menu which is the menu with the “windows/scenes”. This menu offers us much more information and drawing tools. When we open the “scene” window, SketchUp takes a little time to display a miniature of the scene that was previously created in a new window at the top right of your software.
SKETCHUP ANIMATION: DEFINITION AND USES
But what is a scene? A scene stores everything that is not geometry or texture. For example, when we walk around and click on scene, SketchUp animation repositions us exactly with our two-point perspective and all the elements created during the last tutorial thanks to the different plugins added. This is very useful for memorizing camera viewpoints or when we are going to pull out views. If we ever have a modification to make, and if we have memorized our point of view in a scene, this will allow us to bring out the same point of view with the modification. Typically, if we move our table, you can see that when we click on our scene, the table stays in the same place.
SKETCHUP ANIMATION TO CREATE SCENES EASILY
STEP 1 : THE BASICS OF A SCENE IN SKETCHUP ANIMATION
Zoom on the key points to draw realistic scenes under Windows or Mac OS:

If we take the “rectangle” tool and hold down the key to model your ceiling, a practical tip: reverse the face of the ceiling to have the front side at the bottom. To do this, right-click on “Create a group” to create a group of our top view. If we click again on scene 1, we see that our ceiling has appeared. But on this scene we would like to have no ceiling. So use the right button “Hide”. The ceiling is not deleted, it is just hidden.
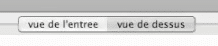
 Now go to “Camera/Parallel projection”. We are now in a completely “iso” projection, i.e. without any perceptive effect. We return to the top view, and see that the cornice loses a little in understanding. So we’ll right-click on it and choose “Hide”. And there we will click on the “plus” to add a scene. We have made a scene with the entrance view and a scene with the top view. In this contextual menu, we can add as many scenes as we want.
STEP 2: THE DIFFERENT VIEWS OF THE SCENES IN SKETCHUP ANIMATION
We are going to click on our scene 1, and click on the little plus and write “entrance view”. We press enter because otherwise the name is not taken into account. Then, we click on scene 2, and we type “top view”. We now have two tabs, an entrance view tab which shows us the cornice, the ceiling and a certain camera angle. As well as a top view that shows us a good plan view, to present, for example, dimensions or a global layout.
STEP 3: MAJ (UPDATE) VIEWS ON SKETCHUP ANIMATION
By the way, in our top view, we have three fixtures that are visible. To update our top view, we right click “update”. Now SketchUp will have remembered that in the top view, the three fixtures are hidden. The difference between hide and delete is that deleting deletes in all scenes and hiding can only be in one scene.