Hello everyone. Architects, computer graphics artists, drafters, designers, developers, landscapers and creators have been working with SketchUp pro for years. Find out why with this tutorial. In this tutorial, we’re going to look at positioning and rotating components in SketchUp. It’s time for the “SketchUp move object” tutorial! This tutorial ” SketchUp move object ” and many others are available on Adebeo. The main part of this tutorial can be found in this video on our youtube channel. And you can find on our website all SketchUp training and licenses, in one package or in floating license.
The SketchUp tutorial move object step by step
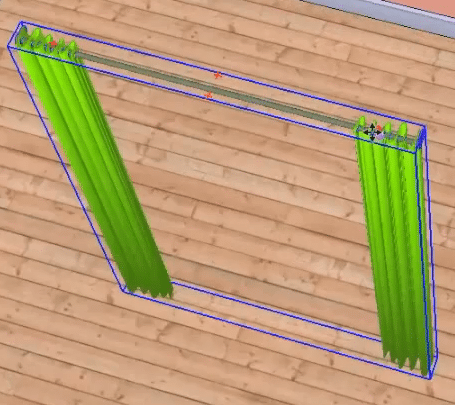
 For this tutorial “SketchUp move object”, we will first upload a component. To do this, we will click on the box with the yellow arrow, and mark “curtains”. We will, for example, go to page 5 and choose one of the models and download it. It’s better to choose the models with English words in order to have a wider choice. With a click, we have positioned our imported component. However, it is not on the window at all. So, to rotate it, we will take the “move” tool and not the “rotate” tool. We hover over the top. When we hover over the top, there are little red crosses.
Tuto move object Part 2
Then, for this tutorial ” SketchUp move object “, we make then a click, and we release, then again a click and we release. At this point, the curtains are positioned in the right direction. We will make so that these curtains touch the wall. Small technical memo to remember the operation to be made:
YOU – single click selection tool
I MOVE YOU – move tool
FROM – click on the starting point and release
(ALONG THIS AXIS) – direction and shift pressed or keyboard arrow
TO THE – click on the arrival point
We will take the “selection” tool and click on the object we want to move [YOU – single click selection tool].
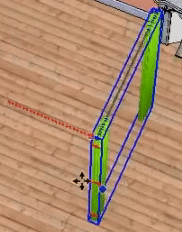
Then we take the move tool [I MOVE – move tool]. [For this operation the most important thing is to zoom in to see where you are starting from. We click and release. So above all we don’t let the finger down, we release it well. Then, we unzoom. We can go anywhere, it doesn’t matter. And there, [ALONG THIS AXIS], we give the direction of the red axis. We then hold down “Shift” and you can see that our curtain only moves along this red axis.
Tuto move object part 3
We only have to click, for example, on the wall [A LA] on the arrival point. We have then positioned our curtain along the wall.
Now, for the next part of the “SketchUp move object” tutorial, we would like to position it at the top. So we click on the object, since [YOU] is already selected. We move it [FROM], so we click on the starting point. That is, we press the top arrow. Now our curtain moves only vertically. And we click, for example, on the top point of our window. Now, to move our curtain, we’ll start at about the middle point. We hold down “Shift” and click on the middle of our window. The curtain is positioned.
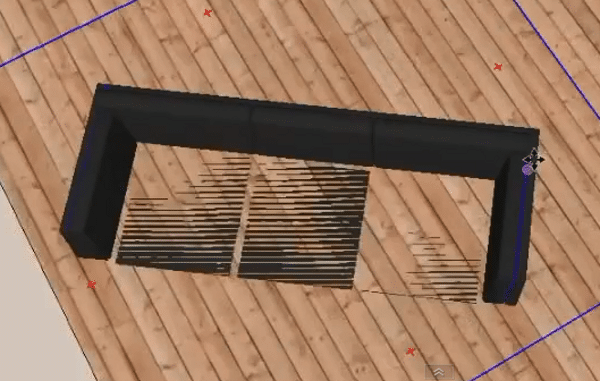
Regarding the rotation, in our component download, we will download a sofa. But it is placed in the middle of the living room, which hinders the continuation of our tutorial “SketchUp move object”. In order to move it, you should definitely not click on it anywhere and try to move it because it can sink into the floor. Like this, for example:
Tuto move object part 4
When we click anywhere on the starting point, we arrive anywhere. To move the furniture (things that touch the ground), it is best to take the time to zoom in. Then click on a point on the floor.
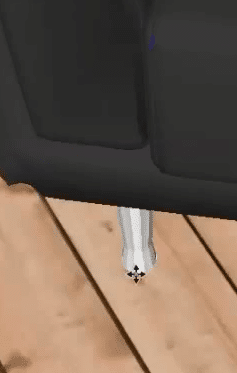
And then, wherever you are, the sofa stays at ground level. The other method is to click on a level of the ground and to stay there. On the other hand, if we fly over the wall, of course our sofa takes off. And that’s it, the “SketchUp move object” tuto is done! In addition to this “SketchUp move object” tutorial, you can find the list of our other tutorials here.
Please leave your opinion in the comment below.
Other Adebeo SketchUp tutorials and training
This tutorial ” SketchUp move object ” gave you an overview of the capabilities of the SketchUp pro construction and design software. Adebeo offers other training and tutorials to master the 3D modeling software SketchUp. Learn how to draw in 3D, simulate realistic models and advanced industrial designs… From geometrical parameters to user interface, from computer aided design to 3D printing, become a SketchUp pro. License the best cad software available! SketchUp outperforms all its competitors, from Autocad to Solidworks and Dassault-Systems, from Blender to Maya.
Understand the toolbar, use the libraries and image banks, learn to import and export files in skp format. The SketchUp CPF, 3D printing, wood, V-Ray training courses will help you get to grips with all the features of SketchUp. Plug-ins make SketchUp the best software for design and architecture. Mastering dimensioning, drawing, and layout will all be acquired through SketchUp training. Not to mention mastering plugins and computer-aided manufacturing (CAM).