In this new tutorial, we will show you how to position the camera in the SketchUp modeling software. In our model, to save time, several elements with dimensions available in the libraries have been imported: radiators, sofas, lamps, doors, tables and chairs. But also body guards, texture on the walls and on the cornices, small paintings, shoes, books, an Ipad… The window is open, the chairs are not well aligned… We were able to give life to our model thanks to the import of elements. Designers, architects, decorators or even graphic designers specialized in motion design will find a great use for SketchUp Camera. How to create a scene with a realistic rendering to model with SketchUp camera? The essence of this tutorial is to be found in this video from our Youtube channel:
Getting started with SketchUp Camera
In our model, several elements have been added: radiators, sofas, lamps, tables, chairs, doors. But also body guards, texture on the walls and on the cornices, small paintings, shoes, books, an Ipad… The window is open, the chairs are not well aligned… We were able to bring our model to life.
This is the time to choose a camera viewpoint and your lighting preferences. To do this, we will use the “position the camera” tool. This is the little guy with the red cross. Click on it, and this little guy appears. Our camera will be positioned as if we were looking from the little red cross. So it’s as if we were standing at this point, our feet were on this point. Click on it again; we end up with a “pair of eyes” tool. This tool in SketchUp allows you to rotate the camera. So by rotating our camera horizontally, our point of view changes.
In our model for SketchUp Camera, we are in a rather large room. This particular configuration of a large space adds a difficulty to the shooting. For this, we’re going to use the zoom tool in the SketchUp drawing software, but we’re not going to click on it. We’ll just see that when we zoom in, SketchUp gives us a 35° angular field. This corresponds to the human angular field. So we’re going to specify this field to type in 60 (which is the maximum recommended calibration for realistic rendering); then press enter. At this point, for the same SketchUp camera positioning, you have a much wider angular field. So you see more. We can go up to 120 but that’s a little off. In the case of kitchen or bathroom models, for example, you can go a little higher because the rooms are very narrow. For other configurations, it is better to limit this action to the values indicated. Remember to save your export.
How to use SketchUp Camera

Let’s go back to our “eye” tool. This one indicates that we have an eye height of 168cm. If we enter 135 cm as a variable in the box, we will have a height of eyes positioned at 1m35. It’s up to you to personalize your visualization according to your desires and those of your client by working on the inclination. The last element to edit and parameterize to draw a nice view is in “Camera/Perceptive at two points”. You will then see that all the lines are perfectly vertical. This is the advantage of the two-point perceptive. However, as soon as we go into orbit, we will lose this two-point perceptual effect vertically and the associated geometry.
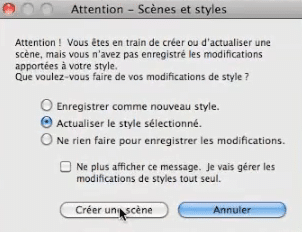
So, once we have found the interesting camera viewpoint, go to “View/Animation/Add Scene”. SketchUp pro asks us if we want to make any style changes. For now, click on “update selected style” and then on “Create a scene”. Here you are with a new active layer or tag.
Exporting with a renderer
Only the pro version of Sketchup DAO allows the addition of extensions and therefore of a rendering engine like Vray for example. However, this plugin is essential to produce a professional, aesthetic and realistic visualization of your scene and components. Whether you are on Windows PC or Mac, the plugins and drawing tools are compatible to import your scenes and obtain a photo rendering. You can then use a video converter to export your scene in creative animation on Youtube for example. Also, for a 2D use of the 3D drawing with advanced graphics settings (resize, crop…), retouching software such as Photoshop, Lightroom, Indesign or Illustrator for example can take over.