This tutorial follows this one: Sketchup Tutorial | drawing tools: line, rectangle, dimension entry. We will discuss the drawing tools “Circle”, and “Polygon”.
Once again you can find the essence of this tutorial in this video from our youtube channel:

The circle tool allows you to make circles (as the name suggests). To make a circle, simply click on the “Circle” button or if you like keyboard shortcuts, use the “C” key. Since SketchUp does not use curves, your circle will be composed of several segments. SketchUp will basically make you 24 segments for a circle. You can change this number in 3 different ways. The first is to specify the number of segments before you click a second time to create your circle. The second way is to enter it afterwards. These two ways do not differ in the result, it changes the number of segments of the circle you make but also the following ones. To do this, simply enter the number of segments you want, adding “s” to the end. For example, if I want 12 segments for my circle I enter “12s”. The third way is to change the number via the “Entity Info” window. To do this, select the segments of the circle (clicking on a segment selects the whole “curve”) and then go to the “window” menu and “entity info”.
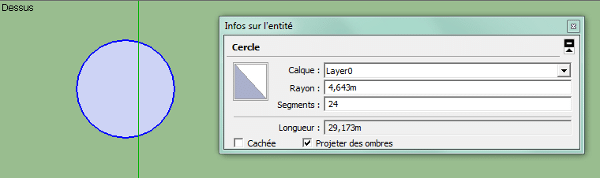
We have several pieces of information in this window. The one we are interested in is obviously “Segments”. You can change this value in this window. This is very useful because you can do it at any time, not just when creating the circle.
It is useful to change the number of segments to suit the size of the circle and where we will see it. If you make a circle of 5cm it will be perfectly useless to put 100 segments for it. This will only make your file heavier, and if you need to make a lot of circles, it can quickly become annoying, requiring more resources than necessary. It is therefore interesting to reduce the number of segments when it is small. On the other hand, it is a good idea to increase the number of segments when your circle becomes larger, so that you don’t see them.
Another thing to know is that when you enter a measurement, you are entering the length of the radius and not the diameter.

The polygon tool allows us to make regular polygons, i.e. it will have segments of the same length. It is very similar to the “circle” tool. In fact the circle tool is nothing more than a polygon with more segments. In fact, if you tried to change the number of segments in the circle tool, you may have found that you could make a triangle by entering “3s”. Similarly, if you want to make a square, all you have to do is enter “4s”.
The difference between the circle tool and the polygon tool, when the same number of segments are entered, is that the angles are smoothed out for the circle, but not for the polygon. This is what it looks like when we give a 3rd dimension to our circle/polygon:

We can see on this image that in the case of the circle we do not see the edges unlike the polygon.
Now we have seen the “circle” tool and the “polygon” tool. In the next tutorial we will see the “arc” and “freehand” drawing tools.