SketchUp 3D design software has dozens of features in its toolbar, from the ruler tool to pencil. These are further enhanced by the plugins that strengthen the user interface of the 3D modeling software SketchUp Pro version. In this tutorial, Adebeo presents the “paint pot” tool (whose real name is “Colorier”). We will focus on the use of this tool on Mac only. In addition, another tutorial will be made soon for this tool on PC, which has some notable differences. So, let’s go for the “paint pot” and “mac color dropper” tutorial!
SketchUp : Tutorial for the use of the paint pot and the mac color dropper
The main part of this tutorial can be found in this video on our youtube channel:
 The shortcut for the “paint bucket” tool is the “b” for “bucket”. When we have the dialog box, and we click on the small header, it allows us to show or hide the different modes of color selection. On the Mac, we have the chance to have direct access to the color wheel, RGB (Red, Green, Blue), the spectrum, the colored pencils or the brick.

The idea is to navigate through the different libraries. For the example, we will take the “color” library. We click on the color and see the active color (eg red in the video). As soon as we click on an element (e.g. the cornice, which is a group), it is set to the chosen color, namely red.
By using the “selection” tool, we can double click on the group of walls and floors to enter the edition of this group. Therefore, we will be able to apply a color only to certain walls and not to the whole group.
We will then change the library. On your side, take the time to explore all the libraries. Let’s say we want to apply the floor in one room and put it in another. So we have to take the paint can. With it, we will hold down the command key (the old apple key), at which point the paint can will turn into an eyedropper. The eyedropper, as in Photoshop, will allow us to recover a color to apply it elsewhere. So we hold down apple to retrieve the color and then we release apple and click.
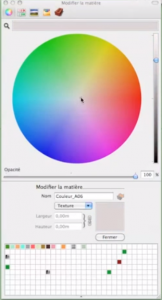
A small note to modify the colors: we will click on the “little house”.
We arrive in a special library that corresponds to the libraries in the model. We find all the colors that we have applied before. If we want to change a color, we double-click on it. At the bottom, a window called the “modify window” is displayed. We can, for example, go to the color wheel and directly change the color of the desired element.
When we hover over the model (with the paint tool that turns into an eyedropper), we can change the color of the floor by clicking on it. If we want to retrieve a color that already exists, there is a tool: the little magnifying glass that we can call the “pixel dropper”. It will allow us to retrieve precisely the color on which we will click.
And there you have it, the paint pot tool and the Mac color picker no longer hold any secrets for you. If you still have questions after the “Mac color picker” tutorial, you can leave your opinion below.
Other SketchUp tutorials and training on Mac and PC
This Mac Color Eyedropper and Paint Pot tutorial has shown you the basics that can be achieved with SketchUp. However, the pro version of the SketchUp design and architecture software is much more powerful. The number of features offered by cao – dao – fao (computer aided design, computer aided drafting, computer aided manufacturing) is colossal.
Moreover, the versatility of SketchUp opens it to all trades. An architect will be able to model realistic digital models, a landscape designer will be able to simulate their environments. The process of designing a model will be very useful for a designer/developer. Similarly, a draftsman will be able to use the photo editing and animation offered, which is more powerful than on Maya and Blender. It is this versatility that makes the strength of SketchUp. Indeed, Archicad, Photoshop, Dassault’s software like SolidWorks can’t accomplish as many tasks. And this, whether it is for the visualization of a 2D drawing, the export and import of files, or photo-realistic retouching.
Drawing in 3D and simulating photo-realistic models will no longer be a problem for you with our training courses. Adebeo offers SketchUp training courses designed to get you up to speed with the software. Whether you are a beginner or a professional, you will learn everything about extrusion, importing and exporting models, using a 3D printer… As a result, the customization allowed with SketchUp is an undeniable professional plus. Thus, adjusting colors and background, managing tags (layers), volume, surface and geometric parameters will be easy after training. From the Mac color picker tutorial to the wood training, Adebeo offers you all the solutions to discover the SketchUp license!