Hello. This tutorial is dedicated to SketchUp Pro and in particular to scale dimensioning. We will see how to add dimensions to scale. I remind you that Layout is available in the pro version of SketchUp. It is used to make layout plans, building permit plans, scale plans…
The main part of this tutorial can be found in this video on our Youtube channel:
 We will talk about the “dimensioning” tool. It is very useful because it allows you to quickly display the dimensions. The idea is to click and release each time.
When we select a dimension, we can go to the “Dimension Styles” tool palette. We see that we can control the display and orientation of the dimension. We can also choose the units and whether or not to display them. The unit can be set in meters, centimeters, millimeters with a digit after the decimal point…
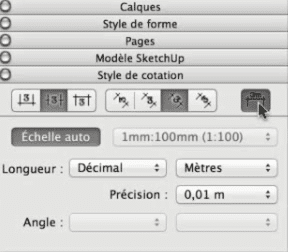
If we go back to our “dimensioning” tool, click and release, click and release again, you can see that we are in meters again. This is true for the dimensioning tool, but it is also true for all the layout tools. When we select an element and make the settings, it is only taken into account for that element. If we don’t select anything, we take our tool and make the settings directly. For example, put in millimeters with no decimal point. Now we can leave the tool, come back to it and find that our settings become the default settings.
In Layout, we can either select an element and make the settings, this only adjusts that one. Or, we select the tool, make the settings and all the next dimensions will be set directly.
Please leave your opinion in the comment below.