In previous tutorials, we have discovered some of the design and visualization possibilities offered by SketchUp Pro. In addition to the tutorials, Adebeo offers SketchUp trainings if you want to improve your knowledge of the software. In the meantime, many tutorials are still waiting for us to master 3D drawing, the design process, the toolbar… In this new tutorial, we will see how to use styles and export images in the 3D modeling software SketchUp. The main part of this tutorial can be found in this video on our Youtube channel. So, let’s go for a SketchUp background image and image export tutorial with Adebeo!
The SketchUp background image and image style tutorial from A to Z
We’re going to do the SketchUp background image tutorial step by step. With our previous two tutorials, we have already created two scenes: a view from the entrance, and a view from above. To discover the styles, it’s very simple. We will go to “Window/Styles”. In the latter, we can see a tab “select” and we will be able to pick different styles from the libraries.
We take one at random from the sketch edges for example. The style corresponds to a display style. As you will notice, this controls all the display parameters. We can, for example, make it look like we have drawn our perceptual by hand. The display style also drives the edge styles. In the latter, we can have only wireframe to see all edges including those behind faces. We can be in white to have the edges but not those hidden by faces. We can be in dominant color. We won’t have a photo realistic texture but just have the dominant colors. Or we can be in shaded with texture to have the faces with photo realistic textures.
When I change my overall style, SketchUp also changes my face style. Because the two are completely linked. The face styles are part of the new styles. After having chosen a style that you like, you will have to click on the scene and right click “Update”.
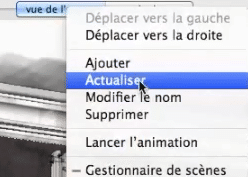
Next, we’ll go to the top view. SketchUp is back in the style we had before. We’ll go back to the “default style” library, and we’ll choose, for example, the “shaded with texture 1” style which allows us to have a white background. We could choose to switch to transparent mode to display everything in transparency. We can also display the back edges, etc… Once the choice is made, we right click “update” on the top view.
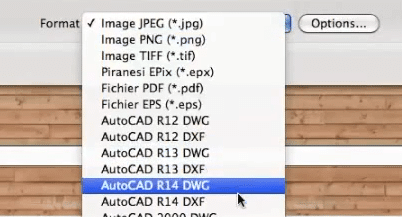
Now, what we would like to do is to output these images in jpeg or png to put them in a Word, Excel, or PowerPoint for example. We will then go to “File/Export/Graphic 2D. From this point on, we see all the formats we can choose. For those who have the pro version, you can even output in AutoCAD version so dxf or dwg. However, the png format is not bad, it’s exactly the same format as jpeg. So anything that is compatible with jpeg will be compatible with png. But it takes into account the transparency and in addition there is no compression of the image.
Then we’ll click on “options”.

Here we will choose an image format. It is not bad to put 4000 pixels. This makes for large images that are very clean and fit well into the A3 format. We can go down to other sizes. We have a post on our site that explains all the image formats. If we can’t fly, it’s because we have the “Use view size” cross checked. You must uncheck it. In the rendering, we check “Antialiasing”. We click on OK, we choose a file name and we click on export.

The image will occur, and on our desktop we will end up with a png image that will match our file. And that’s it, the SketchUp background image tutorial is done! You will be able to re-use this knowledge for other digital models.
Tutorials, SketchUp training, and other Adebeo offers
This SketchUp background image tuto was able to show you some of the capabilities of computer-aided manufacturing. The cao-dao (computer aided design and drafting) software SketchUp Pro dominates the market because of them.
Whether it’s Dassault’s Solidworks, Photoshop, Archicad, Maya, Autocad, Blender, no software can match SketchUp’s assisted design. When it comes to photo editing, the best cad software, or model animation, SketchUp ranks first. Dassault’s software does not have such a high level of CAD sophistication, Adobe Photoshop only focuses on retouching. In fact, the versatility of SketchUp 3D design software and its plug-ins is its strength. Simulating environments, taking into account curves and geometric/volumetric parameters of a building is not an obstacle. If you’re looking to draw 3D digital models with assisted drafting, SketchUp is for you. But don’t worry, the design process is easy to learn!
Indeed, SketchUp and its plugins are deciphered by many Adebeo tutorials. These tutorials are like this SketchUp background image tutorial: they can be done by a beginner. Moreover, Adebeo has a range of training courses adapted to professionals. So 3D printing, importing and exporting files, model libraries like Warehouse will have no secrets for you. Each plugin makes the task easier while increasing the number of tools, the rendering engine, the textures… Yes, from extrusion and layout to calculating the yields and costs of a material, SketchUp can do everything. That’s why it’s suitable for a beginner as well as a seasoned draftsman, architect, developer, designer. So get a SketchUp pro license!