The advanced functions of the erase tool
In this tutorial we will see the eraser tool. For its basic use, I invite you to read this tutorial SketchUp Tutorial | shift and erase tool. Here we will see the advanced features of this tool.
The main part of this tutorial can be found in this video on our youtube channel:
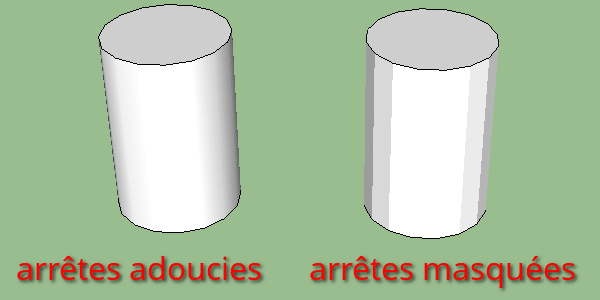
 This time we’ll use our erase tool to hide our edges or to smooth them out. Hiding the edges simply allows us to keep our segment while not displaying it on our SketchUp view. Of course we will see that we can find this edge thanks to the “hidden geometry” view. Smoothing allows you to smooth the edge: not only is it hidden but SketchUp will also smooth the angle of this edge giving the impression of a rounding. To understand the difference, here are two polygons of 16 segments each, one with smoothed edges and the other with masked edges.

You can see that when we mask, we keep the hard angle which gives us this facet effect. On the other hand, when we soften, we do not have this effect. Moreover, in the tutorial: SketchUp Tutorial | drawing tools: circle and polygon, we saw that the circle tool automatically smoothes its edges unlike the polygon tool.
To smooth out the edges, simply hover over them with your erase tool as you would to delete them, but press the “ctrl” key if you are on Windows or the “cmd” key for Mac. To hide these edges the principle is the same except that we will use our “shift” key. Now if we want to remove the smoothing of the edges we can hover over them by pressing the “shift” and “ctrl” keys (or “cmd” on mac).
For hidden edges, however, we will have to use the “hidden geometry” view. To do this we go to the “view” menu and choose “hidden geometry”. In this view we have all the hidden geometries revealed to us as dotted lines. You will notice that the hidden edges have a finer dotted line than the smoothed edges
.

We select our hidden edges with our selection tool and then we right click and in the contextual menu that appears we choose “reveal”. And there you have it, our edges are back.
In the next tutorial we will discuss the paint pot tool for Mac. The PC version of the paint pot tool is slightly different, so we’ll see that later.

